
This area allows you to create your membership programs that you can set expire on a specific date, be a rolling membership that expires a set number of days from date of purchase or have no expiry. It’s important to review the HELP wizard carefully before creating a membership to understand all the opportunities available not just from building a membership, but also redeeming and accessing deals and discounts.
To create memberships, we will need to cover the following:
- Creating a Membership.
- Creating member ticket type(s) for redemption so that the member can login to their accounts and get cheaper tickets and other benefits. We’ll also review adding the member ticket type(s) to a pricing template that will then flow into the events/activities applicable for redemption.
- Review the online members account login process including the renewal process.
- Review the Customer & Transactions area where you can access the members information including the members statistics area, the printing of letters, sending of emails and renewing of membership accounts.
- Printing of letters (if applicable) for new members, renewing members and lapsed members.
- Review ‘Marketing Tags’ under the Marketing menu and the application of members.
- Review ‘Deals & Discounts’ and the opportunity to offer members discounts as a %, dollar value, discount or free ticket/items, products etc. There are many opportunities available.
- Review the Membership report.
Manage Memberships – The Listing Page
This is the main screen where you can search, create, edit, make inactive and delete memberships. Please remember that when you enter a search parameter or select a status, click ‘Clear Filters’ to return to the default view. From the top of the page, you can search for a membership by name by entering a search term or filtering by status, ‘Active’, ‘Inactive’ or ‘All’. You can only delete a membership if there are no sales against it. If there are sales, the bin icon will not appear. Even if you refund a membership and your sales count is at 0, you will not be able to delete the membership as there is still a transaction present (i.e. refund) and this keeps the audit trail clear. You can always make a membership inactive by flicking the ‘Active’ switch from the table.
If there are multiple membership types, e.g. Theatre Membership and then the sub-types are Gold, Silver and Bronze, click ‘+Types’ to reveal all the sub-types.
You can sort the memberships alphabetically, by date created and last modified by clicking on the directional arrow (ascending and descending order).

You will also be provided with an overview displaying the expiry date of the membership (e.g. no expiry or 365 days from date of purchase), pricing and live inventory totals showing how many have been sold/are available.

Tip: You can click the membership name to change the name.
Steps to Build a Membership
Click ‘+Create A New Membership’ to start building your membership.
Tip: Once you have saved a membership, the direct link to sell this membership online is listed at the top of the page.
Step 1: General Information
What is the name of your membership? This is the main identifier of your membership. For example, this could be a ‘Theatre Membership’, a ‘2021 Membership’ or an ‘ABC Membership’. If the membership has sub-types such as Gold and Silver, or Single, Family etc., you’ll create these in step 2.
Description: Enter a description that will help your customers understand how the membership works and any key information.
Membership image and video:
This image or video will display at the top of each sales page and as a tile in the online store. Use a high-quality image – up to 2mb: 800 × 600px (4:3 ratio). You can add multiple images and images will rotate.
Upload Image: Upload multiple images to promote your membership. You can even favourite an image so that it appears first in the rotation list.
Add Video URL: Allows you to add a YouTube video URL. Format must be http://www.youtube.com. This will rotate in the image area.
Select eCard Template: Select a template from the list below and people who purchase will be sent an eCard membership pass.
Click ‘Add’ to add a new template, ‘View’ to view the template design and ‘Edit’ to change the details of the template (Standard and Enterprise clients only). We will email the card(s) to the customer’s nominated email address. The card can then be presented for scanning and verification purposes.
Select Printed Membership Layout: Select a template from the list below and people who purchase will have their membership cards printed (for Standard and Enterprise plans).
Click the ‘Add’ icon to add a new template, the ‘View’ icon to view the template and ‘Edit’ to change the details of the template. Depending on your delivery methods selected below, all membership cards will be printed via a BOCA ticket printer. You can also print an A4 page to a Local Printer. The card can then be presented for scanning and verification.
Venue Restriction – Select the Venues: Allows you to restrict the membership by venue in circumstances where you only want the membership to be valid for a specific venue. If you are running multi venues that are quite different and have different membership programs, this is perfect for you.
Delivery methods: How do you want your membership to be delivered? Select at least one option below by clicking the active switch.
Depending on your plan and access, select a delivery type from the list below. For Standard and Enterprise clients, click ‘Manage Global Delivery Methods’ to customise your delivery methods. You can also access your default delivery methods (Standard and Enterprise customers) by clicking on Settings > Organisation Settings > Step 3: Sales & Delivery.
For Basic account customers, your defaults are set to Email Confirmation Only (no physical membership cards are issued), Local Printer (tickets are printed as A4 to a local printer), eticket (sent as an attachment to the confirmation email) and mobile phone (an SMS is sent to your mobile/cell number with a link to access the barcodes). For Apple users, you can add barcodes to your Apple Wallet for storing and easy access.
Please note: If you select Email Confirmation Only, all other delivery options will be disabled as the system will assume that the customer/patron will only receive an email – and no membership cards will be issued.
For further details about delivery options click here.
Additional Information – Free text field 1: This is where you can add any additional information on the membership card or membership ticket. This is helpful if you are wanting to add any extra wording around how to redeem or login information.
MARKETING AND SOCIAL MEDIA
Would you like to turn OFF marketing codes for this membership? i.e. how did you hear about this membership?
This will turn off the marketing code question from appearing just for this membership. For example, you may decide that marketing codes aren’t required for this membership. Simply click ‘YES’ and the question will not appear.
Do you want to modify marketing codes for this membership?
By selecting yes, you can change the default marketing code question and choose/add your own marketing codes. If you select no, the previously set up global marketing codes will apply. If you update your marketing codes below, this will also update your main marketing code templates list available under Marketing > Marketing Codes. Click ‘Manage’ to manage your global marketing codes template list.
Enter marketing code question e.g. How did you hear about us?
Change the default marketing code question that will appear for this membership.
Tool tip: When people purchase, both back end/internal sales staff and online customers will view the marketing code question.
Select the marketing codes you wish to associate with this membership
Select marketing codes from the drop-down list or click ‘Add’ to add a new marketing code. Any marketing codes created will also be added to your global marketing code templates list available under Marketing > Marketing Codes. To link directly to your main global marketing code templates, select ‘Manage’.
Opt-ins
Select the marketing opt-in messages you wish to activate for this.
Opt-ins are a form of permission marketing where users/customers “opt-in” to receive follow-up communication via a specific communication channel. For example, opt-ins can be employed to send further information about what you have on offer to customers or to add them to specific mailing lists.
Manage Global Opt-In
Click here to edit an existing global opt-in or add an opt-in that you wish to display in the entire system. Please read the HELP wizard on the page carefully to get an understanding of the process.
+ New Module Level Opt-In
Click here to add a module level opt-in, which means that it will only apply to this particular membership. This option is available so that your organisation level opt-in grid isn’t clogged by opt-ins that are only going to be used once.
Social media integration
To integrate social media (Facebook, Instagram) with this membership please select your preferences below.
Tool tip: Set your social media defaults in Marketing > Social Media.
Social media settings allow you to change your specific settings for particular memberships. You need to account for scenarios where this offering may be private and therefore not available on social media or where the product may require a specific direct link to Facebook.
Do you want to modify social media for this Membership?
Select YES if you would like to edit the social media settings for this particular membership. With NO selected, your global settings under Marketing > Social Media will apply.
What is the URL for the Membership Facebook page?
This is the specific URL for your membership Facebook page. By adding the URL here, our system will connect ‘likes’ to the Facebook page.
Do you want to enable Facebook likes? This will enable Facebook likes to your event’s Facebook page.
Share Settings
Do you want to enable social media share settings? Allows people to share to Facebook, Instagram…
This allows you to turn on ‘Social Media Share’ so that people can share your memberships. You can choose how your customers share by selecting your preferred social media platforms and choosing the look and feel of the buttons presented online with 4 options given (grey, square, coloured, circle). We recommend turning on as many options as available. The more sharing, the more likely other people will see what memberships you have to offer. Social media options are visible to people right up to the confirmation page and confirmation email. Let your people spread the word.
EMAILS AND MESSAGES
Activate Internal alerts?
Internal alerts are communication alerts to your team members e.g. “international delivery is not available with this item.”
Internal alerts appear as either a splash alert just below the header or pop up where the operator needs to press OK to confirm. The alert can either occur at the start of the sales process (i.e. you need to warn the customer before purchasing) or on the Finalise Order screen.
Activate Online Alerts?
Online alerts are communication alerts to your customers notifying them of specific conditions e.g. “This item is not available for international delivery.”
Online alerts appear as a pop up where purchasers need to press OK to confirm and continue with their purchase. The alert can either occur at the start of the sales process (i.e. you need to warn the purchaser before purchasing) or on the Finalise Order screen.
Message
Change the default SOLD OUT message for this membership?
In Settings > Organisation Settings, you have the ability to add your default SOLD OUT message. If you would like to customise the message for this membership only, enter text below.
Purchase Confirmation Email
Do you want to add a special note?
Tip: Your special note will be added to the confirmation email to alert your purchasers of important information outside of your terms and conditions.
Do you want to attach additional documents or files?
Select the document from the list or click ‘Add’ to add a document. Click on ‘Select a File to Upload’, enter a file name and description, if preferred, and click Save. You can also click on ‘Manage’ to manage any centrally controlled documents that might be being shared by multiple events/activities and products or memberships you are creating.
Documents will be attached to the confirmation email and be printed if that option is available. For Standard and Enterprise customers, batch printing/bulk printing will display the option to print documents as well.
Member Welcome email: When a customer signs up and becomes a member, you can automate a welcome email that the customer receives. This area has a drop-down menu where you can select the relevant template. Ideally you would want to select the “Membership Welcome Email”. As this is a template area of a number of different membership templates, please ensure you select the correct template. For example, if you select the Membership Welcome Letter in the Member Welcome Email template area, your emails will not send. To change the wording of the email template, head to Tools & Templates > Email/Letter/SMS Templates > Membership Emails & Letters.
Member Welcome Letter: When a customer signs up and becomes a member and the sale could have occurred as a walk-up sale where the customer was present, or you intend to print the letter and post it or make it available for collection, you can print a welcome letter. Once you finalise an order, and you’ve selected ‘Print’ as the delivery type, the letter will appear on the right-hand side of the ‘Transaction Successful’ page. For Mail or Collect options, these can be printed via ‘Build & Manage Members’ under the Membership menu.

This area has a drop-down menu where you can select the relevant template. Ideally you would want to select the “Membership Welcome Letter”. As this is a template area of a number of different membership templates, please ensure you select the correct template. For example, if you select the Membership Welcome email in the Member Welcome Letter template area, your letters will not appear for printing. To change the wording of the letter template, head to Tools & Templates > Email/Letter/SMS Templates > Membership Emails & Letters.
Terms and Conditions
Do you want to modify Terms and Conditions for this Membership?
Select YES if you want to modify your terms and conditions for this membership from your organisation terms and conditions i.e. the terms and conditions for a membership may be tailored compared to your global default.
FINANCE AND REPORTING
Primary and additional taxes
Review and adjust your taxes accordingly. By checking the active box, these taxes will be applied to all transactions associated with this particular event.
Tip: Click Manage Global Tax to adjust your taxes for your organisation.
GL Account Codes
Select a General Ledger account code from the list below or click ‘Add’ to add a new GL Account Code. You can also ‘Manage’ your global GL Account Codes.
General Ledger (GL) account codes are numerals you assign to different debit or credit entries to make accounting easier and more functional. This is useful for when you would like to generate a report and you would like to identify memberships with a specified code.
When clicking the ‘Add’ button for a General Ledger account code, simply enter the GL account code name and internal description.
Reporting Codes
Select a Reporting Code from the list below or click ‘Add’ to add a new Reporting Code. You can also ‘Manage’ your Global Reporting Codes.
Reporting Codes allow you to streamline your reporting, which is efficient and saves your organisation time. For example, you may setup a group of memberships with a specific reporting code and track the success of those memberships within your organisation.
Adding a Reporting Code: click the ‘Add’ button and enter the Reporting Code and click Save.
OPTIONS AND ADD ONS
Is this a featured Membership in online sales?
If YES, this will be displayed with a featured badge and appear at the top of your online sales listing page.
Do you want to show remaining Membership inventory in online sales?
If YES, this will display online how many memberships are left for purchase. This is particularly useful if you don’t have many memberships left to offer.
Do you want to obtain customer details for each Membership holder?
Select YES if you would like to obtain details for each membership purchased rather than just from the purchaser (who may be ordering multiple memberships). This is an added layer of validity for your memberships.
Do you want to activate questionnaires per member?
Questionnaires/Surveys gives you the functionality to collect information from customers per member or per transaction. Per member questions could include questions about dietary requirements and per transaction questions could include topics about membership improvement or thoughts on benefits.
Select a Questionnaire from the list or click the ‘Add’ button to add a new one. Click ‘Manage’ to access previously created questionnaires through Tools & Templates > Questionnaires/Surveys.
Do you want to activate questionnaires per transaction?
Would you like to ask questions at a transaction level for the purchasing of your membership(s)?
Per transaction questions could include topics about membership improvements or thoughts on a membership.
Enable Donations?
Select a campaign from the list to make your fundraising campaign(s) available when people purchase a membership. Fundraising campaigns can be setup via the Fundraising/Donations menu.
Tool tip: You can create fundraising campaigns specifically for your organisation or for specific campaigns that you may be supporting e.g. Cancer Council Foundation.
Activate All Campaigns for this Membership?
By selecting YES, all active campaigns will be associated with this membership. You will also have the option to set a default campaign in this instance.
Cross-sell related events and products? Sell similar items or other items that would be of interest.
Tool tip: Enter Headline Text e.g. Customers who purchased xxx also bought these.
You are able to add up to 4 cross-sell items e.g. 1 cross-sell could be another membership or click here to purchase other t-shirts available. You can also mark a ticket type/discount when building an event/activity as an exclusive offer so you could do a deal where if you purchase a t-shirt, you get 10% off selected events.
- Click Add Event/Product to add a cross-sell.
- Select relevant module and items that will form part of the cross-sell.
- Select relevant items from your list to be associated with the 1 cross-sell.
- Upload an image for your cross-sell
- Add a sub-heading, e.g. purchase a comedy show and get 10% off
- Add a description to explain further information about the cross-sell.
- Repeat the process above up to 3 times to add 4 different cross-sells.
Do you want to change the order confirmation redirect link?
This function allows you to redirect your customers to a default webpage once a shopping cart payment has been processed. Redirect customers back to your home page, a sponsor’s page or your social media page such as Facebook. It’s your choice.
Enter payment confirmation page redirect button label:
This is the label of the button that customers click e.g. Click here to go to our Facebook page.
Enter short description to appear above button:
Enter a short description such as “Now that you order is complete” which appears above the redirect button.
Enter URL:
Enter the full URL link that customers are to be redirected to including the http or https details.
Adjust refund fee for this Membership only?
Under Event/Product Settings, for both refund and exchanges, you have the option to adjust these fees at a membership level. If you do not check this box, the option would not appear here.
This allows you to then override your fee at a membership level or reduce the price to 0. This could be ideal in situations where your policy could be to charge a refund and exchange fee, but when a membership is cancelled, this flexibility will mean that you will not need to adjust your organisation level refund and exchange policy.
Adjust exchange fee for this Membership only?
Under Event/Product Settings, for both refund and exchanges, you have the option to adjust these fees at a membership level. If you do not check this box, the option would not appear here.
This allows you to then override your fee at a membership level or reduce the price to 0. This could be ideal in situations where your policy could be to charge a refund and exchange fee, but when a membership is cancelled, this flexibility will mean that you will not need to adjust your organisation level refund and exchange policy.
Step 2: Set Membership Pricing
Set Pricing & Expiry:
When is your membership available for purchase?
Set when your membership is available for purchase from (on-sale). The system automatically assumes current date/time. Simply select the date and time from the controller to override the default setting.
Once purchased, when is your membership valid until?
Select from one of the options for membership expiry.
X number of days from date of purchase:
Enter number of days: Enter the number of days from purchase date i.e. 365 days for a 1-year expiry.
Enter number of days for renewal period start: This allows you to enter a number of days before the membership expires where the ‘Renew Now’ button will appear online in the customer’s account area or via the box office back end application under ‘Customers & Transactions’, in the customer record under the ‘Memberships’ tab.
Backend box office view:

Online customer account:

Enter number days (Grace Period) before member status will lapse? This is an important function for memberships. This is the number of days after a membership expiry date that customers will still have the option to renew their membership without it lapsing entirely (including still having access to features and benefits). For example, if the grace period is 30 days and the expiry is Dec 31, the member will still be able to renew their membership until Jan 30 without it lapsing. It’s important to note that if the customer was to renew their membership for another year during the grace period, the membership will automatically start from the day after the original expiry, not the day they renewed.
Select expiry date from calendar: Select a specific date from the calendar by clicking into the date field. The membership will expire on the date specified at 11.59pm.
No expiry: This is ideal if you have lifetime memberships with no expiry.
Send Automatic Renewal Emails & letters?
Select YES to automatically send renewal emails/letters to members to remind them that their membership is due to expire or lapse. You have the following options:
First Membership Renewal Notification
Select an Email Template: select the ‘First Membership Renewal Reminder Email’ and customers will receive a notification of their renewal. As this is a template area of a number of different membership templates, please ensure you select the correct template. To change the wording of the template, head to Tools & Templates > Email/Letter/SMS Templates > Membership Emails & Letters.
Number of days this email is sent before expiry: This is where you set the number of days you wish for this email to be sent before the expiry e.g. 60 days for the first notification.
Select a Renewal Letter template: Select the ‘First Membership Renewal Reminder Letter’ template and customers will receive a notification of their renewal. As this is a template area of a number of different membership templates, please ensure you select the correct template. To change the wording of the template, head to Tools & Templates > Email/Letter/SMS Templates > Membership Emails & Letters.
Number of Days this letter is sent before expiry: This is where you set the number of days you wish for the letter to be sent out before the expiry. The letter would normally be set to be available to send earlier than your reminder email template, particularly if you are posting these letters.
Second Membership Renewal Notification
Select an Email Template: Select the ‘Second Membership Renewal Reminder Email’ and customers will receive a second notification of their renewal. The email will not be sent if the member has renewed in between the first renewal notification and the second. As this is a template area of a number of different membership templates, please ensure you select the correct template. To change the wording of the template, head to Tools & Templates > Email/Letter/SMS Templates > Membership Emails & Letters.
Number of Days this email is sent before Expiry: This is where you set the number of days you wish for this email to be sent out before the expiry e.g. 30 days for the second notification prior to expiring.
Second a second Renewal Letter template: Select the ‘Second Membership Renewal Reminder Letter’ and customers will receive a second notification of their renewal. The letter will not be available to print if the member has renewed in between the first renewal notification and the second. As this is a template area of a number of different membership templates, please ensure you select the correct template. To change the wording of the template, head to Tools & Templates > Email/Letter/SMS Templates > Membership Emails & Letters.
Number of Days this letter is sent before expiry: This is where you set the number of days you wish for this letter to be sent out before the expiry e.g. 40 days for the second notification prior to expiring. The letter would normally be set later than the email notification due to the time taken to print and potentially mail.
Lapsed Membership Email Notification
Lapsed Membership Email: This is a notification by email to the member that their membership has lapsed. The lapsed membership email will not be sent if the member renews before the lapsed period. You must carefully select the ‘Lapsed Membership Email Notification’. As this is a template area of a number of different membership templates, please ensure you select the correct template. To change the wording of the template, head to Tools & Templates > Email/Letter/SMS Templates > Membership Emails & Letters.
Set Number of Days after Expiry: This is where you set the number of days you wish for this email to be sent before the expiry date e.g. 1 for 1 day after expiry.
Lapsed Membership Letter: This is a notification letter to the member that their membership has lapsed. The lapsed membership letter will not be sent if the member renews before the lapsed date. You must carefully select the ‘Lapsed Membership Letter Notification’. As this is a template area of a number of different membership templates, please ensure you select the correct template. To change the wording of the template, head to Tools & Templates > Email/Letter/SMS Templates > Membership Emails & Letters.
Set Number of Days after Expiry: This is where you set the number of days you wish for the letter to be sent after the expiry date e.g. 1 for 1 day after expiry.
When would you like to start and end scanning for this membership?
Do you want to activate Scanning? This allows you to active scanning, when selecting ‘YES’ the membership will appear on the scanning device (Android or Apple phones). This is handy if you have memberships that require year-round entry. For example, exhibitions and museums etc.
Start scanning date/time: Two popup boxes will appear to select the date and time you wish the scanning to start. For example, you may want to start scanning on the 1st of January even though the memberships are purchased in advance.
End Scanning date/time: Two popup boxes will appear to select the date and time you wish the scanning to be end.
Set Limit Total Number of Door/Gate Entries: This allows you to enter the number of total scans into the venue/venues. For example, you may have a membership that you only wish to have a limit of 1 entry per month. In this case you would enter 12.
Do you want to activate Scan out? If you select scan out, this will allow the member to go out and back into the venue/location. To restrict the number of out and back-in scans allowed, enter a value into the box provided against the ‘Set the Daily Re-entry Limit’ (if applicable).
How do you want to sell your membership?
By activating the below options, they will filter into the membership table below.
Activate sales channels: Activate how you want to sell your membership via sales channels i.e. Internet, Walk-up.
Would you like to apply any fees? If you are wanting to add any fees you can simply click on the tick boxes for any fees you wish to apply. We will add these options into the table below.
Transaction Fees: Charge a fee no matter how many memberships are purchased.
Per Item Fees: Set a fee per membership sold. If a customer purchases 10 memberships, a per item fee will be charged on each membership.
Inside Fees: If you select ‘YES ‘, a box will appear asking ‘how many inside fees are required?’ and you can enter as many inside fees you wish to add. Inside fees are hidden from the price but deducted in reports. This is particularly important if you are working with external companies/departments that will be allocated a ‘cut’ of the purchase.
Other membership options:
Track inventory for this membership? If you click ‘YES’ an additional box will appear into the membership table at the bottom of the page to enter how many memberships, you wish to sell i.e. you may only want to sell as many memberships as the capacity of your venue. If you wish to have ‘unlimited inventory’, simply click the box to active unlimited inventory.
Do any membership types include more than one person? This is designed if you are building a membership for a group or family. If you select ‘YES’ two boxes will appear below in the membership table that will allow you to enter a minimum and maximum number of members. For example, if you are wanting to have a family pass of four, below in the table, you will enter min 4 and max 4 or if it’s a couple, 2 in each field. For groups of a range e.g. min 6 max 10, enter min 6 and 10 in the max field. Where min and max applied, the customer will not be able to purchase any less or more than this.

Above: The display of entering details of each member.
Are there different membership types available? This is great if you are wanting to setup different membership levels such as Gold/Silver as membership types.

If you select ‘YES’, on top of the membership table will appear the ‘+Add Membership Type’ button. You can add as many extra membership types as you like.
Change pricing when a membership is renewed? You can automatically set a price increase for your membership program for each renewal period. If the member presses the ‘Renew Now’ button online, they will then be charged the new renewal price.
If you select ‘YES’, an additional question will appear ‘How many renewal fees do you want to set in advance?’. For example, you could increase your membership price by 10% or $10 each renewal period. This will allow you to automate the process rather than manually activating the renewal process. You can also rename your renewal fees simply by typing over the text in the box provided that will then populate to reports.
Enter the relevant information into the table below which is controlled by the information you selected above. If you have multiple membership types, i.e. Gold, Silver, ensure you select ‘YES’ against ‘Are there different membership types available?’.
The delete option against a membership type is only available when no sales have occurred.
STEP 3: Membership Summary/Verification
You are almost there! Review all the details relating to your membership.
The front-end sales link allows you to copy and also send the link for review to as many email addresses’ as you like.
Either click ‘Save’ to save your work or click ‘Go Live’ to make your membership live and start selling! (according to the on-sale dates).
Other Important Steps for Creating Memberships:
1. How to create Member ticket type(s) for redemption so that the member can login to their accounts and get cheaper tickets and other benefits. We’ll also review adding the member ticket type(s) to a pricing template that will then flow into the events/activities applicable for redemption.
Once a membership has been created, the next step is to give access to specific events/activities for members. Simply click the option to restrict a ticket type to member only and select the relevant membership or membership types. Once the ticket type is assigned to the relevant pricing and then assigned to events/activities, the member will only have access to ticket types they are authorised to access. For example, the member may only have access to events hosted by the venue rather than external events held at the venue. The global area for Ticket Types is under Events > Tools & Templates > Ticket Types.

2. Review the online members account login process including the renewal process.
The member can login to their account via 2 ways.
- Against the event/activity once they click ‘buy now’ (see below first screen shot).
- Login header on the page (person icon) which once clicked will reveal the login options (see second screen shot).
Above: The process of logging in via an event/activity.

Above: Once the login process is expanded, the above details are revealed.

Above: Once the member logs in, they have a wide range of options to review including their membership details.
3. Review the Customer & Transactions area where you can access the members’ information including the members statistics area, the printing of letters, sending of emails and renewing of membership accounts.
Within the customer record, the current membership a customer holds will be shown on the top right-hand side.

Under the ‘Memberships’ tab, you can view all the memberships that the member has including the type of membership, date joined, renewal date and more. If renewal emails and lapsed letters and emails have been selected, they will appear against the membership. You can also click ‘Renew Now’ to renew the customer’s membership.

4. Printing of letters (if applicable) for new members, renewing members and lapsed members.
If letters have been implemented in your membership build, they can be printed via the below area.
New Members: For printing of new member letters in bulk. A reminder that when you sell a membership, you’ll also have the opportunity to print the letter at the point of sale which will remove the letter from this area.
Manage Renewals: These are the letters for member renewal reminder 1 and reminder 2. If a member renews in between letter 1 and 2, the letter will not be visible in renewal reminder 2.
Lapsed Membership: Applies where the membership has lapsed, and the member no longer has access to benefits.


How does the printing process work?
Select the relevant criteria such as delivery method (i.e. print mail separate to collect), membership type, sales date range (i.e. intend to print today’s memberships only) and click ‘Search’.
Manage Renewals also has the option of filtering by First Reminder and Second Reminder Letters.
Select the print icon from the results to print letters.

If a membership has cards that will print to a BOCA, this must be done from here. Letters can also be printed and sent to the customer.

Once you select to print, you can filter and select (x) number of orders, expand orders and select particular memberships to print by clicking ‘Print Selected’ or ‘Print All’ (by clicking on ‘Select All’).

As the membership letters print, a spinning tool will appear until the memberships have been generated. Once printed, the system will state how many orders have been printed.

5. Review ‘Marketing Tags’ under the Marketing menu and the application of members.
Tags are based on what a customer purchases, donates or spends. These tags can be assigned to a customer either automatically after a transaction, or manually (i.e. venue accessibility, seat preference). Tags are primarily used to understand more about the customer and are primarily generated in the Customer Marketing Report for generating lists to market to these customers. They can also be used to flag customers during a sale i.e. Big Spender, Gold Donor, VIP etc.
Tags can also be applied to memberships. For example, you can track customers who have a particular type of membership and spend (x) amount and donate (x) amount within a period. These members can then be provided with further discounts as ticket types can be assigned to a tag profile. Please review the tags module carefully to understand this process.
6. Review ‘Deals & Discounts’ and the opportunity to offer members discounts as a %, dollar value, discount or free ticket/item, products etc. There are many opportunities available.
Deals & Discounts allows you to select a membership or membership type and then allocate a discount value for members and also waive fees such as delivery fees, ticket fees, payment fees and transaction fees. You can even set discounts for specific events, merchandise/products, a voucher or even purchasing another membership at a discount.

Above: Selecting the Membership to then allocate the benefits the member will receive.
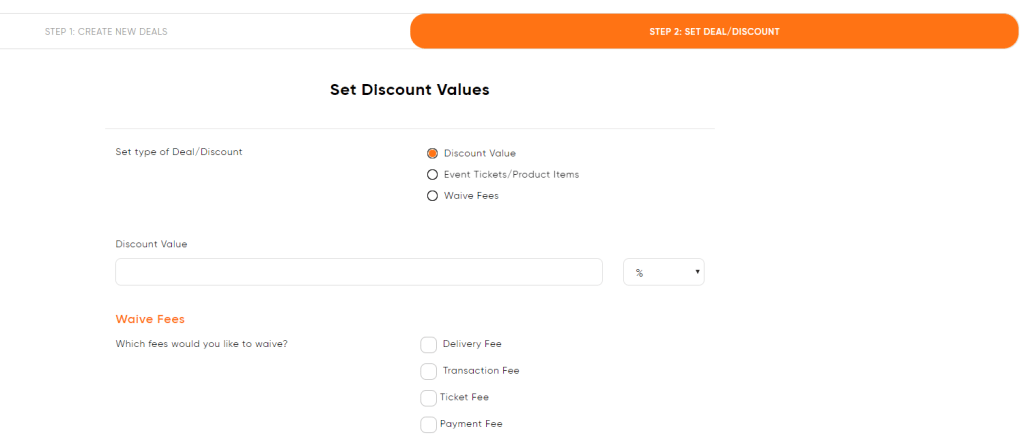
Above: Step 2: Set Deal/Discount – Allows you to select a ‘Discount Value’ deal, discounts on ‘Event Tickets/Product Items’ and to ‘Waive Fees’.

Above: Selecting your events/products to then discount as a % or $ (or your local currency) value. For example, you could select particular events, dates/times, ticket types that a member gets access to. You can limit this to specific events and any ticket type if required where the member will be able to get a discount of say 100% meaning at no cost. You can set min’s and max’s that must be purchased for the discount to be allowed.

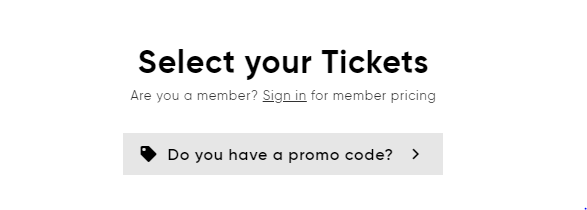
Above: A view of the online customer account where the member heads to the special offers area and can view their membership benefits. The member is able to check their redeemed history (e.g. redeemed 6 of 10), and a ‘Redeem Now’ option or if all redeemed, the button is greyed out. Once a member clicks on the deal, they will be diverted to the sales page with the relevant items that form part of the deal.

Above: If a member clicks through the sales process and is logged in and has benefits, their benefits will be viewable on the right-hand side of the ‘Finalise Order’ screen.
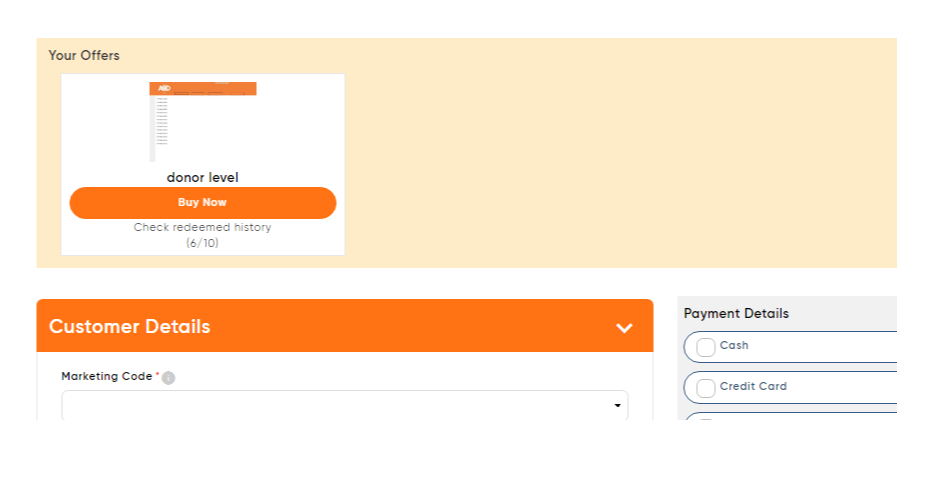
Above: Staff selling at the ticket counter are presented with ‘Your Offers’ relating to the member if the members details are entered and validated. Clicking ‘Buy Now’ will divert them to the sales listing page and display the deal events/items.

Above: If a discount value is applied, or waiving of fees, the original price will be presented as crossed out and the discounted price listed. The Special Offer Discount is also clearly presented to staff.

Above: For ticket sellers’ reference, if you select a member who has a deal, the sales process will list the members details throughout the process for clarity.

Above: The process of redeeming a Deal (Special Offer) from Customer & Transactions > Deals and Discounts sub menu under the customer record. You can view the deal name, description about the deal, redeem history and the option to redeem now. If all items within a deal have been redeemed, the ‘Redeem Now’ button will change to ‘Redeemed’.

Above: The click here option against a deal will clearly show what the member is entitled to.
7. Review the Membership Report.
Click Reports > Membership Report, to gain an insight into your members.
Select to generate the report by sales date range and/or Membership or Membership Type (Gold, Silver).

Once data is generated, you’ll be able to view a wide range of data including the members’ details, membership type, transaction date, expiration date, numbers of days until expiry and any grace period that may apply.

RECENT UPDATES
New Enhancement in Membership Build
A new membership feature has been introduced to prevent the use of the same email address for Primary/Secondary membership setups. This enhancement is now live.
- A new question has been added under the Options and Add-ons tab in Membership Build Step 1.
- If the first question, “Allow customers to use the same email address when purchasing a membership?” is turned ON, then the second question, “Would you like to restrict the use of the same email address for purchasing a membership if the ‘Primary Contact’ checkbox is not selected?” will be visible.

Example Scenarios:
For example, you have two membership types—Adult and Child—where the Adult membership can serve as the Primary.

Scenario 1:
- If the two questions are set as YES and NO respectively:
- Purchasing two adult memberships with the same email address will not be allowed unless the Primary Contact checkbox is selected.
- Purchasing one adult and one child membership with the same email address will be allowed, regardless of the primary checkbox status.

Scenario 2:
- If both questions are set to YES:
- Purchasing two adult memberships with the same email address will still require the Primary Contact checkbox to be selected.
- Purchasing one adult and one child membership with the same email address will also require the Primary Contact checkbox to be selected for the adult membership (this change is due to enabling the new question).

Validation for Expiry Date in Membership/Merchandise
We’ve made some updates so that a validation message will appear if the expiry date/days are selected in Step 2 of the Membership/Merchandise build and no input is provided.


Text Change in Customer and Transaction > Membership Tab
In the Customers & Transactions section, under the Membership Tab, we have updated the wording from “Renewal Date” to “Renewal From Date.”
