
Friday 1 May: Click here to download PDF version
Please press control shift R to refresh your browser to see latest changes.
- ‘Click me for help’ added
The toolbar now has a ‘click me for help’ wizard that will take you straight to a search page to find the content you are looking for rather than clicking on each individual page in the system. We’ll be adding further features to the search system in the coming weeks.

- Back button
When clicking the back button on the second page of a module (events, merchandise etc.), the system will now divert the customer to wherever they’ve come from. This could be a direct link (i.e. comedy shows), from the home page of TicketSearch or from your own website.

- Venue Seat Maps
Venue seat maps have been increased to accept up to 2000 seats. Please remember to press control shift R to clear your cache prior to building a new seat map.
- Image sizes have been updated
We’ve updated areas that use images to display the image file size accepted and dimensions. The help info is either populated on the page or as an info link (see screenshots below).


- Membership, Donation and Transaction Imports
You can now load membership, donation and transaction info from your previous system through Settings > Customer Database Import. We’ll be sending through a separate help file on how this works early next week. A reminder that you can already import customers, tags, marketing opt-ins, interests and notes into TicketSearch.
- Major Enhancement- Activate Discount Pricing
We’ve added the ability to discount pricing as a percentage or dollar value from pricing templates against an event, right down to the session level. For example, you may want to discount a family pass or an adult ticket, whether it be for the perceived value of the ticket or any other representation.
Both online and for box office sales, for general admission and seating plans, the system will display the original price crossed out and the discounted price. The discounted pricing is also shown against the transaction, on the confirmation email sent to the customer and the online customer account.
To use this function online, view the details below the following screen shots.
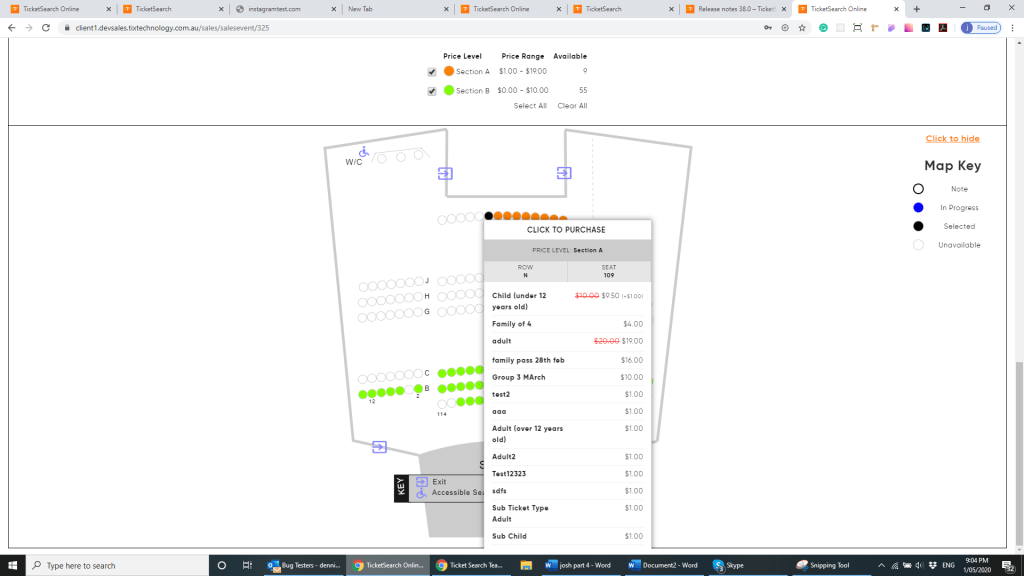
Above: Rollover of a seat map showing discounted child and adult ticket.

Above: Child ticket type once you select a seat displays the discounted price.

Above: ‘Choose seats for me’ displaying the discounted pricing.

Above: The online confirmation page for the customer.

Above: Against the transaction, showing the discounted price and the original price.
Reports that show ticket types have now been updated to show the original and discounted price, allowing you to calculate the cost of offering such discounts.
How does it work?
Once you click ‘Activate Discount Pricing’, you can set a discount type based on a dollar value or a % e.g. 5%. The system will then calculate the discounted net value from the total. In all sales channel flows, i.e. Internet, Walk-up, the original price will appear with a red strikethrough and the new price will be displayed. This is a great way to highlight to your customers that the price is discounted and promote a higher purchase opportunity.
Tips: Only apply the discount price to the ticket type you want to apply it to. Leave all other types as is. Also copying a discounted price table will also copy the discount options. Price range will display based on the discounted values. Once you have clicked discounted pricing, to revert it back to normal view, you will need to cancel and click back into your pricing template. If you have accidentally clicked on ‘Activate Discount Pricing’ and don’t wish to use this function, you can simply leave the input fields for this blank.


- **Important Enhancement made to Upsells Merchandise Module (client request)
We have made a major enhancement to module level upsells. Upsells were previously controlled to go onsale and offsale according to the modules onsale/offsale policy.
Also, sales channels matched the module i.e. events level upsell.
Selecting sales channels – We’ve changed this process so that when you add an upsell, you need to now select what sales channels the upsell should be available in. If you leave all unchecked, the upsell will not display. You can therefore elect not to display the merchandise online or at another sales channel.
Onsale/Offsale – By default, if you leave this section blank, the upsells will follow the onsale/offsale period of the module. However, if you had a pre-dining experience that needed to go offsale 5 hours before the performance/session starts, you were unable to do that. We’ve now given you the ability to set for any upsell type an override option for the onsale/offsale times to give you the greatest level of flexibility.
Inventory override – You have the ability to override the inventory against the specific upsell item. For example, under Merchandise & Add-ons, you may have 100 items overall for size XL t-shirts. However, against the event, you would like to limit the total for sale to 10 to balance the stock between multiple events. As a reference, we are displaying the available inventory count. The inventory override cannot be reduced to less than the available count.

Above: The ability to add a upsell/product.

Above: The display of upsells. You have the ability to activate your sales channels, set onsale/offsale times and adjust inventory for each merchandise item.

Above: In the pop-up window when you click to set your sales channels and onsale/offsale settings, you have the ability to activate a range of functions. Please remember that if you don’t activate sales channels, your upsells will not display.
- Venues Update – New Location, Online event & To be announced options
We have added the ability to set a few new options to where your event will be hosted:
- Location- Enter a location into the field provided for one-off events or where your customers will simply need to meet at a location point (e.g. for tours). The sales experience will show an address (as opposed to a venue) listed right down to the eticket and printed tickets. Organisation level templates are not available for this option. You must create a new pricing template with each event.
- This is an online event- Check the box if you have an online event. No venue and no address will appear anywhere through the sales journey. We recommend you enter into event line 1 or 2 the word ‘online’ so that customers who purchase understand it’s an online event. Pricing templates need to be created for each event separately, they cannot be saved at an organisation level.
- To be announced- This is great if you don’t have a venue announced for your event and wish to build an event/activity or go onsale. We recommend you enter into event line 1 or 2 that the event/activity will be announced. If this option is selected and you then announce the venue, you cannot then select a new venue for the same event build. You should communicate the event details via an email/SMS campaign.
Tip: You can also select an existing venue or add new venue. ‘Select existing venue’ will simply display a drop-down list to select an existing venue while ‘add new venue’ will take you to the venue build process.


- Upgrade to Customer Search
When entering text into the global search by customer area (Customers & Transactions), it was sorting results by surname, first name. The system will still display results in this format, however if the system finds a direct customer profile with the name entered, the system will now prioritise this in the results view. For example, if you had a customer with surname Cleary and another with Leary and you typed in ‘Lear’, Leary would be displayed first, then Cleary.

- Customer record enhancement – Save/Submit
We’ve now added a ‘Save’ and ‘Submit’ option in the customer record with a tool tip that explains each option. Save will save your changes and leave you on the current page while submit will submit the record and take you back to the customer search panel.
If you were updating multiple records and wanted to search again, submit works best while if you were doing a transaction for a customer and updated their record, you would click ‘Save’ and then use the ‘Sell Now’ button on the top left hand side of the page where the system pre-populates the customer information.

- Removed commas after event line 1 (Client Request)
As per your feedback, we’ve removed the comma that is automatically added when you are using both event line 1 and event line 2 text (see below). This allows clients to add any other symbol such as a dash. This has been applied to the backend and front-end sales as well as the event build.


- Voucher Enhancement – To and From for gift (client request)
When selling gift vouchers from the Box Office and a user clicks the option to send the voucher as a gift, there is a new override option that still allows you to enter a to, from and message, but allows you to print, email, mail etc. the voucher direct to the customer in the finalise order screen. For example, you may have a customer who wants to personally give the voucher to the recipient. You’ll now be able to print the voucher with the to, from and message field.

- YouTube Enhancement (Client request)
We’ve enhanced the YouTube venue build and display to now include a ‘main YouTube link’ that could be your main YouTube channel and a second option, which would be a YouTube Video. The Main YouTube Link will be presented as a YouTube logo on the page that will open to your YouTube channel when clicked on, while the YouTube video will be displayed within the venue info page. We’ve also aligned the YouTube video to the left rather than the centre.


- Rollover and double click seat map enhancement (client request)
When you rollover a seat that has been sold, the system now details the order reference number, name and the ticket type purchased, price and per ticket fee (if applicable). You also have access to section, price level, row and seat info. If the price has been discounted via our new discounted pricing option, the original price will appear as crossed out while the new price will appear in black font.

If you click once on a seat that’s been sold, you can now see the entire history of a seat, whether that means it’s been sold, refunded, exchanged or is a reservation. Click on the order reference number to be taken directly to that order.

- Online Customer Account Update- Order history now shows refund of reference number & appears in red
The online customer account has been updated to now include the refund reference number if tickets/items have been refunded. Also, for clarity, the refund details appear in red.

- Email templates upgrade to be more mobile friendly
Email templates have been enhanced to render more mobile friendly and desktop friendly.

- ‘Merge customer’ info tip explanation
We’ve added a rollover help i icon to ‘Merge Customers’ to explain the process. Further information has been added to the ‘show more’ link and also the help wizard. Please note when clicking the ‘Merge Customer’ button, you simply select the primary customer who will be the primary source of contact information and any secondary customers (to be merged into the primary customer).

- CK editor updated to include colour options
Our CK editor which allows you to add bold, italics and other functions without using HTML code, has been updated to now include text colour and background colour (see below).

- Image proportion size enhancement fix in the online experience (client request)
When loading images on the direct link page of an event build, to make the image fit within both the home page format and direct link format, the system was expanding the image to fit 100% within the width. We’ve now enhanced this area to ensure that the image does not appear distorted.
- Printed ticket layout fonts removed
As this feature is unavailable, it has been removed from the editor to prevent confusion. Changing your font will be available at a later stage.
- Gift voucher description not populating online enhancement
If entering a description into your gift voucher build, this was not populating online. This issue has been fixed.
- Membership price range
If the membership price range is equal, only one price is now displaying rather than a price range equal to in value.

- Platform Customisation – ability to hide price range
Hiding price range is now possible. From ‘Overall Customisation’, select ‘Home’ (drop-down list), then click on the price range field, the editor will open right hand side of the page, click ‘Hide this option’ then click ‘Save’ (bottom of page).

- Platform Customisation – Event Name change of size
When the ‘event name’ in platform customisation under the sub menu ‘Home’ is updated in size, previously, you would have had to select the field, update the font size, then click save. If you then needed to make a further change to the event name field for size (change of mind scenario), the system would not update the text size. This has now been updated so that when you click save, you need to reselect the editor to make further changes.
Also, ‘select’ was defaulting to 0 font size, and therefore was invisible. Once you select back onto the invisible point, the event name element editor was displayed. We’ve now updated select to revert to the original field size.

- Online Customisation – Text change in area customisation
When you are in specific modules and areas through platform customisation, the editor page is simply a way to change the elements on the page from the default such as font name, font size and show hidden elements. We’ve updated the text and highlighted it in red to clearly state that if you have applied customisation of colours via ‘Overall Customisation’, this will not be visible on the page.

- Online Password reset
Password reset has been updated to ensure that you can password reset from the customer account panel and also the top right-hand side of the sales process (see below).

- Updated help text to ‘Send test email’ – Email/Letter/SMS Templates
We’ve updated the help text against when sending a sample test email to help clients understand that the information contained in the email will be dummy data. For example, the company name will be identified as Microsoft and the address as 720 Bourke St, Docklands VIC 3208, Australia.

- Payment type Error for Credit Cards
We have corrected an error where the payment fee of 0 was displaying as NaN if there was no payment fee or fees and charges. This error has been corrected.

- Information tip added next to credit card payment type
When a credit card is processed, the number in brackets next to the card type, i.e. next to VISA, displays the payment gateways transaction reference number. This is number you’ll need to use should you contact your payment gateway provider. We’ve added a clear help tip that states this.

- Members description area input CK editor update
We have corrected an error where the text entered into the CK editor was not displaying online with the HTML format i.e. bold, underline, italics.
- Exchange credit update to confirmation email
There was an extra space after ‘Paid By’ and the payment type such as cash and/exchange credit. This has been corrected. Also, in some scenarios of an exchange, ‘hidden’ would appear as the exchange type. This has been corrected.

- Customer data upload – displaying upload user
Under Settings > Customer Database Import, we are now displaying the user who completed the upload (see below).

- Upsell- Upload Mandatory status enhancement
Where an upsell is marked as mandatory, we’ve now added the text ‘Mandatory item(s) are marked with *’. This message will only appear if there are mandatory upsells. Each mandatory item (type, sub type) is marked with an *.


- Marketing > Tags drag and drop function
Drag and drop has been implemented to Marketing > Tags to enable re-ordering of your tags.

- Company Contacts – Administrator
When you register your account initially with TicketSearch, an administrator is appointed. We’ve now blocked the administrator from being made inactive as we need, at all times, at least one contact to uphold the ‘administrator’ role for the organisation. New features are always released to the administrator role.

- Printed/eticket ‘Restore to default’ and ‘previous version’ in ticket layout
Once you update a printed or eticket layout, including your header card and receipt, you have 2 new functions:
- Restore to Default: this willrestore your defaults to those we have in TicketSearch for your organisation.
- Restore to Previous Version: this will restore your template to the previous version saved. If you saved your template at 9am and at 9.10am, then at 9.20am you clicked the ‘Restore to Previous Version’, your previous version would be restored to the one saved at 9.10am.

- Refund confirmation – removal of delivery method and add to Apple Wallet
When refunding an order, the email template sent (which can be customised via Tools & Templates > Emails/Letter/SMS Templates) was populating delivery information and the add to Apple Wallet information from the original order. We’ve now removed those functions as they are not valid in this scenario.
- Taxes set to ‘no’ for adjusted at the module level was completely removing Finance & Reporting Panel
Through Settings > General Settings, you have the option of adjusting taxes at the module level such as events, merchandise, memberships etc. If the option was set to ‘No’ meaning that taxes would not be adjusted at the module level and therefore not displayed under ‘Finance and Reporting’, the system was removing the panel despite 2 other functions being visible under this area including General Ledger Account Codes and Reporting codes. This has been corrected.

- Updates made to Delivery Options
We’ve updated the global delivery methods for Print and Local Printer to what you see in the below image with an information link that explains the process. The info tip is helpful if a user updates the Print message or Local Printer message to clearly explain what actually happens. ‘Print’ will print to a BOCA and ‘Local Printer’ will print to your laser printer. Please review your global delivery methods so that they align with your organisation’s policy.
As the message is compulsory, if you do not want this to print onto your confirmation emails, click edit, enter a space and press the save icon.

- Delivery Options online updated
Delivery options were displaying as lower case rather than the exact match from the backend. As this was an intentional design element introduced, we’ve reverted back after feedback suggested it is better as an exact match from the module builds.

- Tracking of email not set scenarios
Under Sales > Customers & Transactions, if you try and resend an email and that email fails to be sent, we’ve provided a message on the screen. Also, we’ve added the ability to view email send history. If an email fails, the status will record this as ‘Email Not Sent’ and the rollover will explain why the email was not sent.


- Platform Customisation – link colour enhancement
On your online header, if you add a banner that may appear as shaded dark, the ‘Box Office Online’ text and ‘Back to main website’ text would appear faint. We’ve added the ability to upload the colour of the text for each of these fields. Select ‘Back to Main Website URL (colour) and Change the text colour to:(colour).


- Doors not populating to Eticket and Printed Templates
This issue has been rectified.
- Etickets value not printing cents
If the price of your ticket included a value past the decimal point, the system was rounding the value. This has been corrected.
- Online Price Range Correction
The online price range has been corrected to only show prices from the internet sales channel. Excluded from the price range are member, tag and promo code ticket types that require login or entering of a promo code to then view the ticket type. The system was considering price ranges of other sales channels, lowest to highest.
We’ve also enhanced this process so that if there is only 1 ticket price, the price range will display as just the one price e.g. $35.
- Refund exchange fee override to ‘included’
When doing a refund or exchange, and you have a refund or exchange fee, the system will default that as included.
A reminder that at any module level now, as long as you have the below 2 settings checked under Settings > Event/Product Settings, in the modules Events, Merchandise, Memberships and Gift Vouchers, you will be able to adjust the refund or exchange fee e.g. for a specific event (cancelled show).


The below options will appear in step1 of the above-mentioned modules if the adjust options are selected.
