
Other Important Steps for Creating Memberships:
1. How to create Member ticket type(s) for redemption so that the member can login to their accounts and get cheaper tickets and other benefits. We’ll also review adding the member ticket type(s) to a pricing template that will then flow into the events/activities applicable for redemption.
Once a membership has been created, the next step is to give access to specific events/activities for members. Simply click the option to restrict a ticket type to member only and select the relevant membership or membership types. Once the ticket type is assigned to the relevant pricing and then assigned to events/activities, the member will only have access to ticket types they are authorised to access. For example, the member may only have access to events hosted by the venue rather than external events held at the venue. The global area for Ticket Types is under Events > Tools & Templates > Ticket Types.

2. Review the online members account login process including the renewal process.
The member can login to their account via 2 ways.
- Against the event/activity once they click ‘buy now’ (see below first screen shot).
- Login header on the page (person icon) which once clicked will reveal the login options (see second screen shot).
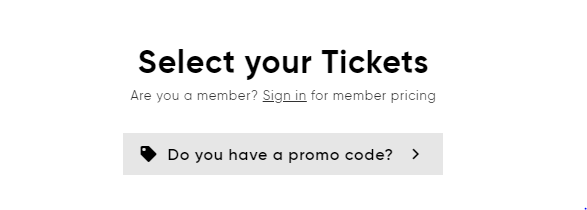
Above: The process of logging in via an event/activity.

Above: Once the login process is expanded, the above details are revealed.

Above: Once the member logs in, they have a wide range of options to review including their membership details.
3. Review the Customer & Transactions area where you can access the members’ information including the members statistics area, the printing of letters, sending of emails and renewing of membership accounts.
Within the customer record, the current membership a customer holds will be shown on the top right-hand side.

Under the ‘Memberships’ tab, you can view all the memberships that the member has including the type of membership, date joined, renewal date and more. If renewal emails and lapsed letters and emails have been selected, they will appear against the membership. You can also click ‘Renew Now’ to renew the customer’s membership.

4. Printing of letters (if applicable) for new members, renewing members and lapsed members.
If letters have been implemented in your membership build, they can be printed via the below area.
New Members: For printing of new member letters in bulk. A reminder that when you sell a membership, you’ll also have the opportunity to print the letter at the point of sale which will remove the letter from this area.
Manage Renewals: These are the letters for member renewal reminder 1 and reminder 2. If a member renews in between letter 1 and 2, the letter will not be visible in renewal reminder 2.
Lapsed Membership: Applies where the membership has lapsed, and the member no longer has access to benefits.


How does the printing process work?
Select the relevant criteria such as delivery method (i.e. print mail separate to collect), membership type, sales date range (i.e. intend to print today’s memberships only) and click ‘Search’.
Manage Renewals also has the option of filtering by First Reminder and Second Reminder Letters.
Select the print icon from the results to print letters.

If a membership has cards that will print to a BOCA, this must be done from here. Letters can also be printed and sent to the customer.

Once you select to print, you can filter and select (x) number of orders, expand orders and select particular memberships to print by clicking ‘Print Selected’ or ‘Print All’ (by clicking on ‘Select All’).

As the membership letters print, a spinning tool will appear until the memberships have been generated. Once printed, the system will state how many orders have been printed.

5. Review ‘Marketing Tags’ under the Marketing menu and the application of members.
Tags are based on what a customer purchases, donates or spends. These tags can be assigned to a customer either automatically after a transaction, or manually (i.e. venue accessibility, seat preference). Tags are primarily used to understand more about the customer and are primarily generated in the Customer Marketing Report for generating lists to market to these customers. They can also be used to flag customers during a sale i.e. Big Spender, Gold Donor, VIP etc.
Tags can also be applied to memberships. For example, you can track customers who have a particular type of membership and spend (x) amount and donate (x) amount within a period. These members can then be provided with further discounts as ticket types can be assigned to a tag profile. Please review the tags module carefully to understand this process.
6. Review ‘Deals & Discounts’ and the opportunity to offer members discounts as a %, dollar value, discount or free ticket/item, products etc. There are many opportunities available.
Deals & Discounts allows you to select a membership or membership type and then allocate a discount value for members and also waive fees such as delivery fees, ticket fees, payment fees and transaction fees. You can even set discounts for specific events, merchandise/products, a voucher or even purchasing another membership at a discount.

Above: Selecting the Membership to then allocate the benefits the member will receive.
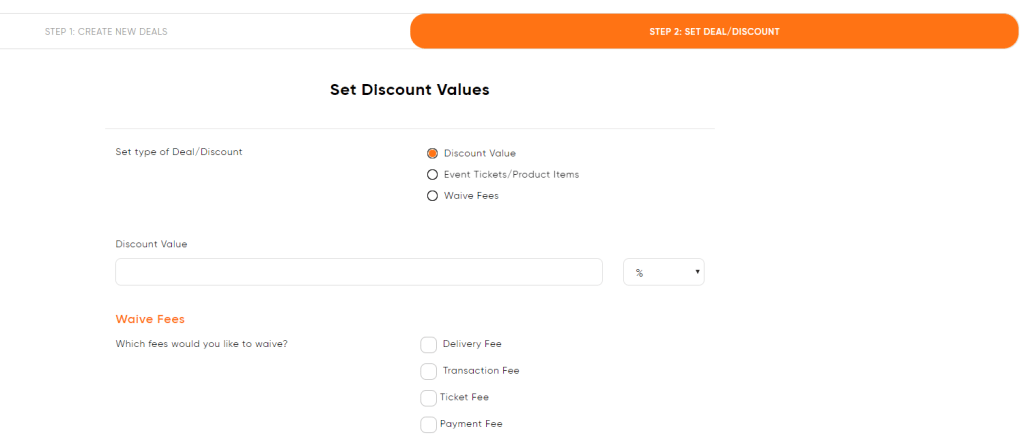
Above: Step 2: Set Deal/Discount – Allows you to select a ‘Discount Value’ deal, discounts on ‘Event Tickets/Product Items’ and to ‘Waive Fees’.

Above: Selecting your events/products to then discount as a % or $ (or your local currency) value. For example, you could select particular events, dates/times, ticket types that a member gets access to. You can limit this to specific events and any ticket type if required where the member will be able to get a discount of say 100% meaning at no cost. You can set min’s and max’s that must be purchased for the discount to be allowed.

Above: A view of the online customer account where the member heads to the special offers area and can view their membership benefits. The member is able to check their redeemed history (e.g. redeemed 6 of 10), and a ‘Redeem Now’ option or if all redeemed, the button is greyed out. Once a member clicks on the deal, they will be diverted to the sales page with the relevant items that form part of the deal.

Above: If a member clicks through the sales process and is logged in and has benefits, their benefits will be viewable on the right-hand side of the ‘Finalise Order’ screen.
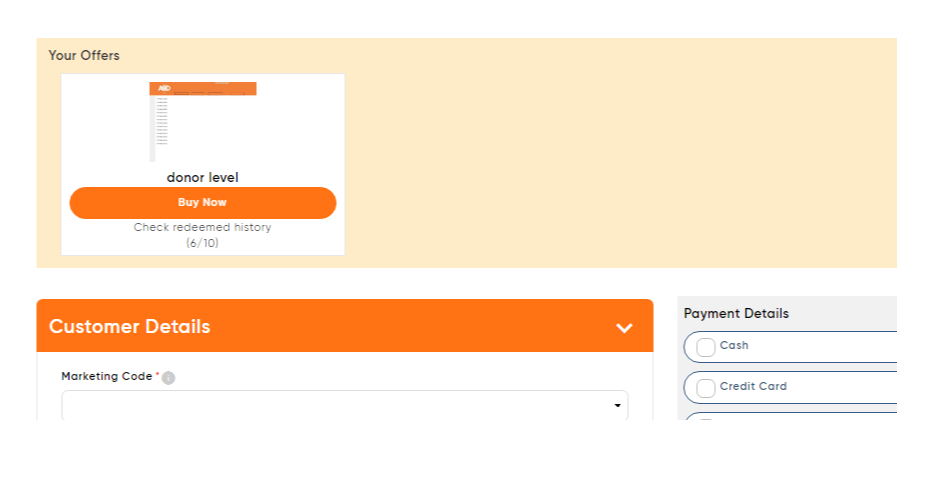
Above: Staff selling at the ticket counter are presented with ‘Your Offers’ relating to the member if the members details are entered and validated. Clicking ‘Buy Now’ will divert them to the sales listing page and display the deal events/items.

Above: If a discount value is applied, or waiving of fees, the original price will be presented as crossed out and the discounted price listed. The Special Offer Discount is also clearly presented to staff.

Above: For ticket sellers’ reference, if you select a member who has a deal, the sales process will list the members details throughout the process for clarity.

Above: The process of redeeming a Deal (Special Offer) from Customer & Transactions > Deals and Discounts sub menu under the customer record. You can view the deal name, description about the deal, redeem history and the option to redeem now. If all items within a deal have been redeemed, the ‘Redeem Now’ button will change to ‘Redeemed’.

Above: The click here option against a deal will clearly show what the member is entitled to.
7. Review the Membership Report.
Click Reports > Membership Report, to gain an insight into your members.
Select to generate the report by sales date range and/or Membership or Membership Type (Gold, Silver).

Once data is generated, you’ll be able to view a wide range of data including the members’ details, membership type, transaction date, expiration date, numbers of days until expiry and any grace period that may apply.
